
Intro
Setting the stage here, but the format of this blog post is gonna be a little different from my last one about the Rocky Top recipe. I do have another recipe to share (well, maybe two), but after trying to brew it two times in a row (different process/update on recipe) I learned some valuable lessons. But before I start going through that, let me layout some background information on homebrewing beer in general. I won’t try to bore you with the nitty-gritty, but at least I will give you enough background information that will help explain more of the things that are highlighted later in this post. This list isn’t all-encompassing but are the basic steps that I follow for every beer I’ve made so far. Lastly, I’m not a brewmaster nor an expert in this field, and everything I’ve learned is through my own research and everything detailed here is for entertainment purposes only!
Beer Brewing (In a Nutshell)


- Recipe Development:
- Selection of Ingredients: Choose malted grains, such as barley, and specialty grains for flavor and color. Select hops for bitterness, flavor, and aroma.
- Water Profile: Determine the mineral content and pH of the water used, as it effects the flavor of the beer.
- Yeast Selection: Choose a suitable yeast strain based on the desired beer style and fermentation characteristics.
- Mashing:
- Crushed grains are mixed with hot water in a process called mashing. The mixture is held at specific temperatures to active enzymes that convert the starches in the grains into fermentable sugars. This produces a sweet liquid called wort.
- Boiling:
- The wort is transferred to a brew kettle and brought to a boil.
- Hops are added at various times during the boil for bitterness, flavor, and aroma.
- The boiling process sterilizes the wort and keeps extract flavors from the hops.
- Cooling:
- After boiling, the wort needs to be rapidly cooled to a temperature suitable for fermentation.
- This can be achieved using a wort chiller or an ice bath.
- Fermentation:
- The cooled wort is transferred to a fermentation vessel, such as a glass carboy, a stainless-steel fermentor, or event a plastic bucket (my preference!). Yeast is added to the wort, and fermentation begins.
- The yeast consumes the sugars in the wort, producing alcohol and carbon dioxide.
- Fermentation typically takes 1-2 weeks, depending on the beer style.
- Carbonation and Packaging:
- If desired, additional sugar or priming solution can be added to the beer before bottling. This allows for natural carbonation to occur.
- Bottles are capped to contain the carbonation.
- For kegging, the beer is instead added to a keg (there are different types, but Cornelius kegs are the most common for homebrew beer) and primed with carbon dioxide.
Making the blonde ale (first go-around)
Brew day

I unboxed all my ingredients (thank you Northern Brewer! No this is not affiliated I just like their products and services.), and immediately afterwards I realized all the specialty grains I ordered were un-milled, so I had to resort to using a food processor to grind them up. The food processor was better than nothing but is not as effective as a grain mill (which I promptly ordered after the brew day 🙂).
Other than the grain mishap, luckily the rest of the brew day went successful, up until the boiling process where the original gravity of my wort was lower than what the recipe projected. There could be multiple things that cause this, but the biggest culprit was that not all my grains were milled properly so they were not able to properly convert during the mashing process. Thank GOD I had a pound of leftover light DME (dry malt extract, think of this stuff looking like powdered milk) that I added towards the end of the boiling process to get much closer to my desired original gravity.


Fermentation

Everything was clean and sanitized, so no issues here. Most recipes I ferment for about 1-2 weeks, but with this one I ended up giving this an extra week because we went on vacation and the beer wasn’t quite ready to bottle. Luckily during the fermentation step if everything stays clean it doesn’t hurt to ferment longer, and can sometimes be better for the overall quality and clarity of the beer.
Bottling
First off, this was the first time I decided to get out the camera gear and record, and I’m hoping to have a video posted very soon! Anyways, this step surprisingly went smooth (maybe because I was recording everything and felt pressured), other than being extremely time-consuming and tedious with having to clean and sanitize every bottle (48 to be exact), fill every bottle (without making a mess!), and cap/store every filled bottle.
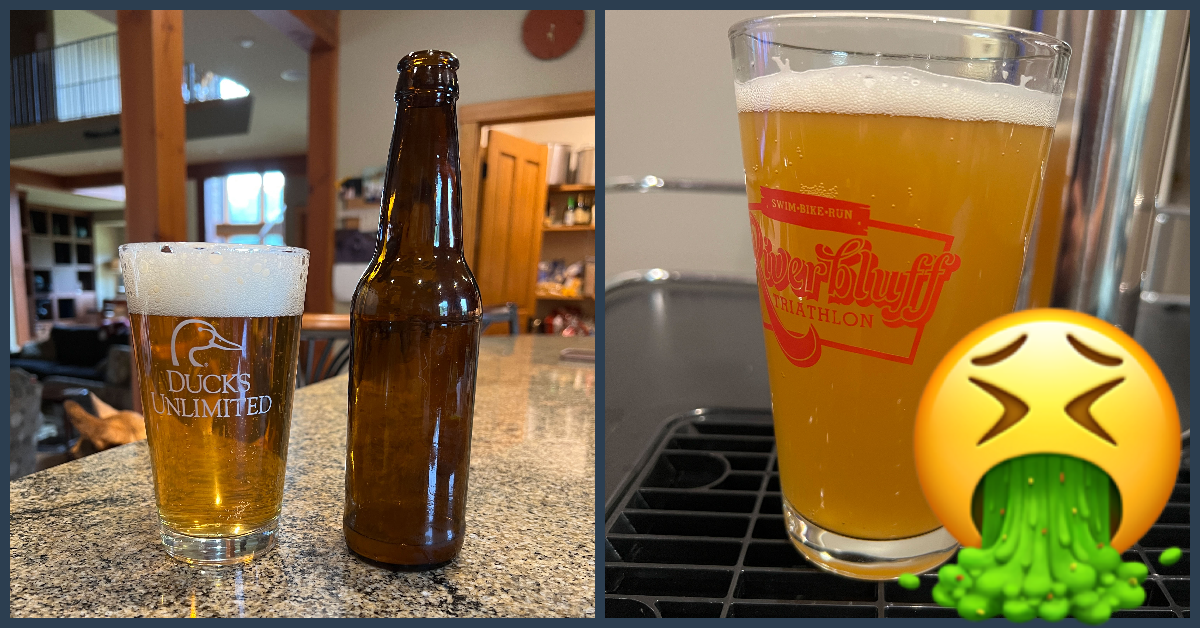
Review of the blonde ale (first go-around)
Appearance: Good clarity, which is vital for light-colored beers. It also had good head retention, meaning the foamy part top of the beer (also known as the “head”) stayed nice and full even a few minutes after the pour.
Smell: Sweet and malty, which immediately reminds me of New Glarus Spotted Cow Cream Ale, which if you know me well enough, you’ll know that Spotted Cow is by far the best beer I’ve ever had in my life.
Taste: This is where all the glory ends, because honestly, I don’t feel it tastes as good as it smells; it’s not bad per-se but has some to be desired. Off-the-bat I tasted just a slight bit of astringency (think of squeezing and drinking the water out of a used teabag), which if there was truly any astringency it would’ve been caused from early in the brewing process—the mash. Aside from that it has a little more hop bitterness than I’d like, but it does have the body and finishes just like what I’d expect from a blonde ale.

Overall, it’s not a bad beer, but aside from it being the best-looking beer I’ve made, I don’t feel it was the best-tasting. So, I took the notes and lessons learned from this brew and decided to try some new things for the next go-around:
- Like mentioned earlier, I ordered myself a new grain mill, and I plan on using it in the future for the following reasons:
- I don’t pay extra nor have to remember to order the grains already milled.It’s a LOT more effective than a food processor!
- I have more control on how coarse/fine I want to mill my grains.
- I added more hops than I would like, which contributed to the overall bitterness. For the next go-around I will slim-down the hops as well as add some flaked corn to add some more sweetness.
- I still have no clue about the quality of our well water, but I want to take this out of the equation and instead use distilled water and add all the salts I need to better match the beer style.
- I noticed some of the bottled beer tasted different than others, which was concerning because it tells me that I had some inconsistencies during the bottling step. So, to counteract this, as well as to keep from having to mess with bottles again, I decided to finally bite the bullet and get a kegging setup!
Getting a new kegerator and kegging setup
I finally said goodbye to bottling and paid the price on a kegerator/kegging setup, and I’ve got the links/pricing available (non-affiliated):
- Kegerator (with CO2 tank)
- Beer line for Cornelius keg fittings
- Conversion kit from Sanke fittings to Cornelius fittings (the kegerator only came with Sanke fittings)
- Kegs (used Cornelius kegs)
A kegging setup is the ultimate upgrade to any homebrewer’s repertoire, but it has its pros and cons:
Pros:
- Time savings! Kegging is objectively a LOT faster and less prep work than bottling.
- All the beer will be carbonated the same, so no worry about inconsistencies you could get with bottling.
- Beer carbonation with a keg is also a LOT faster than bottling, so the beer can be enjoyed much, much sooner!
- The feeling of pouring from a tap is a whole lot more satisfying than pouring from a bottle
Cons:
- It’s a lot more expensive than bottling. Kegs, CO2 tanks, hosing, taps, cold storage for the kegs, altogether cost a lot more than bottles and caps.
- More equipment to maintain/clean.

Right now, this monstrosity sits in the living room, and even though I love fresh beer being in reach, my other half thinks it’s an eye-sore, so you better believe that this thing is going in the new mancave when we get the new house built.
Attempting to make the same beer (with some changes)
Note: I do not have any pictures to share for this brew day, and after reading this I hope you’ll understand why! Now, taking the lessons learned from the previous brew, I decided to make some changes and brew this same recipe again. Here are those changes:
- Reduce the amount of hops used so the beer doesn’t taste as bitter.
- Add some flaked corn to the recipe. Flaked corn is good because it can give the beer a sweeter taste profile, which is the taste I prefer in beer.
- Start with distilled water and add minerals to match the flavor profile of the beer.
Brew day shenanigans
The only thing positive from this brew day is that my grain mill worked very well, but now here come the negatives:
- I decided to brew this during the week because our weekend would be filled with 4th of July celebrations and given my impatient nature I did not want to wait for another free weekend. This is bad simply because a typical brew day takes me about 4-6 hours, so I knew I was going to be in a rush given that I would be having to brew after work.
- I did not have a scale sensitive enough to measure out the needed salts, so I ended up using measuring scoops. Little did I know that the ¼ tsp scoop I had was actually 1/4 tablespoons and not teaspoons, so I didn’t realize till late into the brew that I added WAY too many salts.
- I FORGOT TO PURCHASE HOPS!!!! When I was getting ready for the boiling step, I realized I never had the hops, so I would have to come up with a way to get hops into this beer before it would be ready to drink.
- During the middle of the brew session one of my dogs was playing in the field. When he came back up to the house, I checked him for ticks and immediately freaked out once I noticed a deep gash across the spot in between his front leg and chest. So while I’ve got about 7 gallons of wort boiling in a kettle next to us, Lexi and I are tending to our dog’s wound and keeping it covered until we take him to the vet the next morning… and before anyone goes to saying that I cared more about the beer than the dog, keep in mind that it was 7:30pm so no vet was available, and luckily even though he had a deep gash it was very clean and he wasn’t even bleeding nor showing any sign that he was in any pain. Still to this day I have no idea what he got himself into, but since then neither of the dogs are being let out unattended.


And now a quick note about the hops…
So, hops are particularly important to beer. Not only do they allow for unique flavors and aroma, but they also help keep beer preserved for extended periods of time by warding away bacteria, because, just like my dad (he’s a Miller Lite fan), it turns out that bacteria cannot stand the taste of hops! Since I did not have hops for my brew day, I quickly had some ordered and delivered, and decided to do a similar process by boiling the hops in water (almost like making tea), and once cooled, add the water to my fermenting beer. This isn’t nearly as effective as boiling the hops during the normal process, but it’s better than having no hops at all.
Given all the struggles from the brew day, I surprisingly ended up with a clean fermentation, so it was ready to begin using the new kegging setup, and after studying these steps long before, I knew I was ready to give it a go. Overall, the kegging went smoothly (or so I thought), and I felt there was hope for this beer after all!
Alright, now the stage is set: my second go at a light ale, finishing an exhausting and problematic brew day, and trying out some new equipment I’ve never used before. This beer was gonna turn out great… right…?
Not even close. Yet another negative from the experience that I did not face until the kegging step of the process, which was how to effectively transfer the beer from the fermentor to the keg. I thought I did everything correctly, but I in fact did not correctly transfer the beer to the keg because I introduced too much oxygen which resulted in my beer becoming oxidized. Now, it’s a flat, bitter-tasting mess.

Lessons Learned
Although the experiences brewing these beers through these last few weeks were not the end results I had hoped, I did learn some valuable lessons:
- Good, consistent work takes a lot of time and patience to master.
- Sometimes things don’t always go as planned, and that’s OK!
- If there are obvious signs telling me I shouldn’t do something, I should probably listen to those signs.
Closing Remarks

There’s still a lot to learn about making great beer, and as frustrating as it can be, I love learning new skills and putting them into practice to make something that I can be proud of. Brewing these beers may not have turned out like I expected, but they have taught me valuable lessons that I can either apply to my next beer or elsewhere in my life. And for you, dear reader, hopefully you learned something new, like brewing beer, or maybe a self-reflection on some of the lessons that I shared through my learning experience. Nonetheless, thank you for taking the time to read this post!